
Many Wi-Fi routers focus on HD video streaming and gaming technology. But if you own a large office, you might prefer a more professional Wi-Fi router. The all-new Orbi SXK80 Pro router provides coverage in all rooms, whether a multistory building or a single large area. You can achieve fast and stable internet speed on its 5 GHz bandwidth. The Orbi promises to focus on work rather than play. The SXK80 router login device successfully delivers blanket Wi-Fi to every corner of our home. Let us follow the process of how to set up the Orbi SXK80 router.
How to setup Orbi SXK80 Pro router without any app
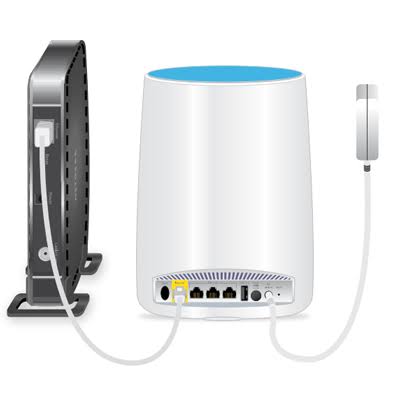
Step 1:
Plug your Orbi router login SXK80 device into a power outlet. After that, wait for the orbi blue light or indicator to turn orange.
NOTE: – Plug your Orbi Wi-Fi router into a power outlet. It should be halfway between your router and the Wi-Fi dead zone.
Step 2:
Next, you need to associate it with the default Wi-Fi name of your router. Now you can complete the how-to setup Orbi SXK80 access process using a wireless computer or a laptop.
Step 3:
- Open a web browser suitable for the Orbi setup process.
- Next, you need to enter the web UID com.
- Or you can go with the IP address “192.168.1.1” in a supported browser’s Address bar.
- And then, press the [ENTER] button to launch the Orbi router login process.
- For this, you should also have the default Netgear password and username details.
Step 4:
Before the end, click the Manual Setup link to know how to set up Orbi without an app.
Step 5:
In this step, enter the default Netgear password and username for your Orbilogin.com login process. It is admin and then click the Login button.
Step 6:
Finally, you can configure your Orbi SXK80 routers, such as the wireless Network Name and the default password for both 2.4 GHz and 5 GHz frequency networks. Do not go away before tapping the Save button.
In this way, you can apply changes to your Orbi router login system. Congratulations! You have completed your Orbi setup process. These were the instructions on how to set up an Orbi SXK80 router without an app. If you face issues with the Orbi setup and configuration process, call our customer care executives for additional help. You can call us for all default Netgear passwords, usernames, login, and setup-related issues.
Orbi firmware update after a successful login: SXK80
- Download the Firmware: –The firmware update file is available in a ZIP file. It is a compressed software containing multiple files. Make sure you unzip the file first after downloading. And then save it on your computer. Extract and SAVE the file from the compressed folder to your desktop.
- Go to the Update section: – Click Browse or Select the file saved on your computer desktop. Go to the desktop and select the Orbi SXK80 update file. It is an image file and the large ZIP file in your downloaded ZIP folder.
A detailed Orbi Firmware update process for the SXK80 router: –
- You either have to tap the Orbi setup and update button.
- It may start automatically to upload the firmware file.
- Here you will also need the default Netgear password to upload the firmware file.
- Wait for the process to complete. It can take several minutes.
- Do not interrupt or stop the process until it finishes on its own.
- The Orbi firmware update finishes while the router LED starts blinking rapidly.
- It signifies that the router is going under reboot. Do not leave the page or turn the router off.
- Once the firmware update completes, you need to reboot your Orbi SXK80 router.
However, the reboot will take place on its own. If it does not, you have to reboot the router manually. You should press and hold the power button to reboot the Orbi SRS60 router after getting the Orbi firmware update. As the Orbi setup starts, the LED light will become stable. You can now login back into your router using its default login credentials.